Sunday, June 30, 2013

You have got to see my alltime favorite roadside find and a funny story to go with it!


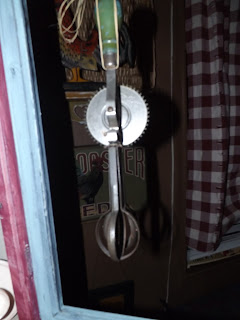
Ok I know that everyone sees some junk on the road side , some pick it up and some are too shy to do so . But if your a real repurposer and have a love of stuff you will slow down , stop traffic if you have to and get that something on the side of the road that has caught your attention. But never pick up curb side stuff with teenagers in the vehical. No! No! No!, they will get down on the vehicle floor screaming about how embarrassed they are. Well one day I was leaving my moms house with my teenage son and there she was standing there as if she had her draw waving me down for a ride to a nice home. Sooo I was in a mid size vehical and she was going with me one way or another. I know this is bad but I had to have my son walk back to my moms and I picked him back up after I took my new piece of furniture home. I couldn't very well leave it unattended it would definitely be gone when I returned. Wouldn't you have done the same for this? I keep this very close to my dining room table which we use daily. The cedar lined boxes where a steal from a great little shop I stumbled upon in my travels. I store all of my wine glasses and pretty not for kids glasses. The blue tone pottery bowls are from Good Will at 1.99 each. They hold my placemats etc., Also 2 little egg holders that I found at .99 each while I was thrifting hand painted from Mexico. The back wallpaper is a border that I have in my service pantry, that's what I call it it is between the living room and dining area. I'll shoot that soon and post it. One of my wooden handled hand mixer hangs with burlap on the door missing glass. The top has some tiny carvings in it and this piece is definitely handmade. If your reading this and you recongnize it at least you know that she got a good home.

Friday, June 28, 2013

Wait, dont through that old pool liner away and that old rusty fire pit either!

About two years ago we bought a fire pit  and it began to rot out on the bottom so I kind of set it aside and the pool liner also just had too many holes to patch so I also set that aside meaning I just couldn't throw them away . Yep , Lisa's the name and repurpose is the game. Some call me a junk collector but when you see what I did with these two items you may change your mind . First up is my tired old fire pit. I put a plastic liner on the bottom with some rocks for irrigation and filled it with soil and plants, not to bad for something I was going to never trash. The pink plant is a Penta and they are hardy and grow nicely.


Second up is the old pool liner, I just put it down over the existing grass and filled the top with some red mulch, I still need to do the edges with decorative blocking. It seems to stay in place fine through all our daily storms and ironically enough this is where my new fire pit is. I guess its all connected. So don't be hasty about throwing things away , find an out of the way place and store them until you are ready to repurpose them.

Thursday, June 27, 2013

Are you elected to bring the potato salad for the 4th of July Picnic? ...Do I have a recipe for you!

Soon enough we will all be celebrated the upcoming holiday, a time when family and friends get together to picnic and enjoy each others company. Have you been asked to bring the potato salad? I had to make up 45 lbs. last Saturday. Something really funny happened when I brought my special potato salad to a recent party I noticed that my salad was not on the huge buffet table joining the other picnic delights. I didn't really want to ask the hostess but a while later I went inside the house to get something and low and behold her husband was taking the salad out of the cabinet and he proceeded to sit down after he grabed a fork. I didn't really know them all too well so he proceeded to tell me that it was some good stuff and that he wasn't going to put it out on the table it was too good. He did not have any idea I made it. Well I guess he just wanted him some of his own potato salad. Later when his wife figured it all out she called and apologized to me. I kindly told her no  problem. Now I bring 2 different bowls so this savvy potato salad eater gets his own lol.
  1. This recipe is really very easy you will need
  2. about 5 pounds of red potatoes
  3. a stick and a half of butter or margarine
  4. red and green onions
  5. a slash of white vinegar
  6. about 3 egg yolks
  7. about 3/4 cup of brown sugar
The procedure is easy first you will cut the potato's into big chunks. Bring to a boil.
once boiled let sit a bit.
Meanwhile heat until melted the butter, once all is melted add the rest of the ingredients a mix well.
Now you pour that mixture over warm potatoes  and mix well. This is a great potatoe salad minus the mayo. You can garnish with a bit of fresh parsley and a shake of paprika.
Be sure to make enough because everyone always takes seconds. What's the name of this , well I guess it's Li's red tater salad! What are you waiting for get to cookin and have fun with it. Happy eating!

Tuesday, June 25, 2013

Tired old stool gets a marvelous makeover!

Hope everyone is enjoying the summerness! Are you bombarded with rain storms, mosquitoes, kids sleepovers and humidity? Well I have this tired old stool that I bought at a yard sale a while back for 2.00, it is one of the strongest stools I have ever seen. It's along side my work table in my kitchen service room. Their is always someone sitting on it either frosting cupcakes or watching me work my magic. So I thought a vintage style makeover was in order. Here she is with her tired old top and light colored legs.  I came across my grandmothers vintage table cloth. It had some holes in it so I thought it was time to repurpose  the beautiful crocheted lace. So I took some black chalk paint that I mixed myself  about 2 teaspoons of baking soda with about 1 cup of paint. The paint should not be to thick and should go on smoothly.  After the paint was dry I proceeded with the cover I used a piece of burlap, I measured it about 3 inches extra so I would have room enough to staple. The next step I took a rubber stamp and gave her some style. Now it was time to incorporate the tablecloth.

Monday, June 24, 2013

A Little Bit Red And A little Bit White And Blue!

Today I'm gathering my red, white and blue favorites and some new as well. I made this sign out of old floorboard. "America The Beautiful", and she is isn't she? She has shed her grace on thee and crowned they hood with brotherhood from sea to shining sea!So I put together some little 4th of July love here and there throughout. You would be surprised how many red, white and blue items I have!
I used hot glue to draw these stars on the sign before painting it. It is really great for adding age to something. Are you decorating for July? Go ahead and go shopping in your house for some red white and blues Happy decorating!
I used hot glue to create these stars before painting.
 

Add caption

Sunday, June 23, 2013

A Tiskit A Tasket A Little Burlap Basket

Raining as usual....so getting used to rainy season. It actually rains everyday, sometimes not all day though. Have you ever needed a little gift for that someone special ? I have been putting together these adorable little burlap flower baskets. They could hang on a door or a doorknob. They are easy and very inexpensive to make. With just the cost of some burlap and some pretty foe flowers and some scraps of materials for the bow you can put this little craft together. The best part is that you can personalize the front with  "happy birthday", or "thank you" or just the gift receivers name.

This is a very simple craft, just cut a desired size square of burlap and form a cone...hot glue the cone shut . Then proceed to do any stenciling  on the front side . The next step is attaching a little handle to hand it up , I used some cording and hot glue. Now it's time to fill with desired flowers. Sometimes Walmart has bags of just the flower tops for 1.00 (it is the flowers that fall off the stems on their displays.) Those work great for this project.If you need a little filler just use some tissue paper and if you like you can spray them with some potpourii spray. Now you can craft a bow out of whatever you like and your done!

Friday, June 21, 2013

Doors galore get a new look!

It's storming like crazy here, that's an everyday thing in this part of the world , good ole rainy season. We never really know if we will lose power or not. I came up with a great solution for my ugly white doors. They are older doors with no personality so I got out my handy wood grain tool and worked some magic! A wood grainer tool can be bought at most craft stores also available at Home Depot. It's a wooden kind of round tool with a handle. It's very easy to do also very forgiving meaning anyway you slide the tool along it usually comes out good. I would recommend that you would take and practice a bit on some cardboard just so you can get the feel of the tool. This door was just plain white so I painted on some light brown paint sparingly though then I run the wood grainer vertically with a rocking motion and incorporate some straight moves as well. It's a good idea to have a couple damp rags on hand one to dab the excess paint
 off of between the wood grainer runs. Also one to wipe some drips off the floor. This brown grained door is in one of my hallways. The most important part is to remember to have light on the base like the white doors and darker on the top like the brown I used. I also used blue on one of the room doors. I hope I have given you an idea to beautify your blahzaa doors. My children are rough on white doors they are always getting scuffed up and dirty. So I hope you will give this technique a try and as always have fun with it!

A close up  I hung a rusty star to jazz it up a bit.

Thursday, June 20, 2013

Let Me Tell You About The Newest Fish To Hit The Market SWAI including a out of this world recipe

How is everyone today? I'm still grueling along in this sweltering heat and humidity can't complain though. I think the latest talk I'm hearing is ...eat more fish, vegetables and fruit. So I saw this fish in the market it is called SWAI. It is from Asia and fairly new to us. So the price was right about 3.99 a pound. I serve up a big meal every evening for my family and for which ever friends happen to be here at dinner. I'm not a big fan of frying so I came up with this delicious recipe guaranteed to please. Swai is about 90 calories per serving. It comes flash frozen and the pieces are individually packaged. The fish is a white meat sweet tasting fish. The recipe I am about to reveal is "company" quality. The first time I made it as an experiment just for my family ,the next time I invited company and everyone asked for seconds. As a former B&B manager I am quite fussy about foods and such.

  1. The following is a list of supplies you will need :
Swai plan on at least 2 pcs per person
  1. Lemons(Lots and fresh)
  2. A few Vidalia sweet onions
  3. Green onions
  4. Butter (a couple of sticks)
  5. Salt and freshly ground pepper
  6. an oblong baking dish
First step is to slice onions and lemons and butter . This is a layering recipe.
first layer sliced onions then top with lemon slices sprinkle with salt and pepper and then top with cut slabs of butter. Now it's time to place a layer of fish on top of that than just repeat with this recipe more is better.The fish should be in the middle with onions , butter and lemons on the top. Bake covered for about 20 min. at 350 degrees then take cover off and bake about 30 or so more min. when fish is done it will appear very white and flakey, if you like dill you could also incorporate that as well but I would not over spice this dish. Rice is the best choice for a side along with a fresh salad. The best way to cook rice is always 2 cups of water to one cup of rice, just put in  covered casserole and cook along side your fish, couldn't be any easier!  It's really great because the fish kind of makes a sauce that we put right over the rice simply delious. To make it extra special I scoop the rice with an ice cream scooper and the top it with a knotted piece of green onion. Well good luck and I hope you will try this soon!

Wednesday, June 19, 2013

A Little Spray Paint And Voilla!

It's nearly 100 degrees and the humidity is a killer, its a stay in kinda day. But I have enough projects to keep me busy. I found this little piece but it was kind of dated and the shelves have flamingos, yuk I hate that I like real flamingos but that's it.
                                                                                  I have this Italian glass canister set that holds my flour , sugar and teas. So I got out my flat black spray paint and gave it the royal treatment. I also did a cute little banner to add to the cuteness.  Old and New! It's a great place for my glass canisters. What will you be working on today? Have a wonderful "cool" day!

Tuesday, June 18, 2013

You will be surprised what I can do with a hot glue gun

I found this poor tired old looking lamp for 3.99 while I was thrifting. The poor thing had no color and just looked so lonely sitting there on the shelf ,I just couldn't resist. Hmmm I thought I'll take this poor thing home and give him the royal vintage treatment. I'm not too crazy I just love my things that I find that need a better way of spirit. The shade was a road side find that I was saving for the perfect mate.
The first thing I did was heat up my trusty glue gun. This is a procedure that I do on picture frames furniture and much more. I simply drew on the base with the glue let it dry completely and then I put a vintage type paint design...... like a light greenish blue and I just work lightly to get the glue design to pop. I used that color and black and white. Not to much paint just enough to give it that vintage feel.  With the shade I just lightly painted it and outlined the seems darker and I did a little stenciling "Family" And the finishing touch a burlap bow. No more boring lamp and she's proud to be front and center in the living room. I certainly had some fun with this project and for 3.99  gotta love it.


Here they are an almost perfect marriage                 


Monday, June 17, 2013

My Beautiful Accidently Decorated Wreath

Whooooo it's hot here and humid that's one of the downfalls of living in the southern most part of Florida. But if you have some sweet tea  with ice and a swimming pool at your fingertips it's ok. It Also has it's advantages, we grow some beautiful vegetables and flowers. Our oceans are like bath water this time of year and the fishing will satisfy the fussiest angler. Did you ever visit the Florida Everglades? That's where I am near , If you haven't been you should go it's amazing.

Anyway I planted a Mandevilla (a gift from my sweet daughter, granddaughter and son inlaw) about 2 years ago in my front flower bed and it was doing Okay but now its gone crazy, its  flowering vines have taken a likening to my grapevine wreath and its decorated it so beautifully. I could not have done a better job. For those who are not familiar with the Mandevilla  it a climbing beautiful flowering plant, loves sun and lots of water. Just so happens we are in are rainy season now so we have storms daily. You kind of have to stay inside  get used to it.Oh did I mention the mosquitoes they wear helmits they are so big. JK ....but all that aside it is great living here and that's a lot said from a Yankee girl. Check out the beauty....
 

Saturday, June 15, 2013

Transform plain glass sliding doors into stylish doors

I don't know about you but I have 3 sets of plain glass sliding doors  and I hated every single one of them , they are just so plain and dated. I have come up with a way to dress these uglys  up. Yes I have tried curtains and wreaths but nothing seemed to work . So I have come up with a great solution , You will need some foil tape and some black spray paint. It's very easy depending how wide you want to make your foe panes , I cut the foil tape in half` length wise so that was the size I have used . You will have to measure your sliders well to proportion the tape evenly.

After measuring and cutting your foil tape you will then bring the cut pieces outdoors and spray paint them all. I used a flat black .99 basic spray paint from Walmart. They dry fairly quickly. Once dry bring them back in and this is when the magic starts. It's real simple just peel the back off and place . This is long lasting , I have had mine up for a couple of years and have had no problems and I wash the glass allot. So for the cost of a roll of Foil tape and a can of black spray paint you can transform a dull slider into a classy slider.
 

Wednesday, June 12, 2013

From Old White dated Ceramic Pieces to Foe Pottery Oriental Tea Set

My sweet dear aunt had gifted me a white ceramic 15 piece set, It was just white but had a really dated country blue design on it....just not my cup of tea. Many of the pieces  were chipped  but all were pretty different from each other such as a coffee and tea pot, creamer, salt and pepper shakers etc.   I could picture a bride about 60 or so years receiving this as a wedding gift.

I had been scanning the thrift stores for an Oriental Tea Set but have had no luck so I did a little compromising and came up with this............It actually looks like real pottery. Just using a simple latex paint  and I created my Oriental Tea Set. I  went one step further and learned some Asian words online Hope, Love , Joy and Happiness. (I still have to practice  a bit but I find Asian Language so fascinating.

  • So if you get a whole of some old ceramic stuff do not throw it away give it new life. And Aunt June I noticed you eyeing that old set when you came to dinner in disbelief but forget it I wont part with these beauties.


Tuesday, June 11, 2013

My vintage looking $1.99 backsplash , Alluminum foil?

Well I have been absent from the blogger world for some time , reason being I'm just too darn busy reading all the other wonderful blogs and their inspiration keeps me crafting and building and getting into all kinds of creative trouble....But I have created a very vintage looking backsplash for nearly nothing. I scanned through my mind repeatedly for a unique backsplash that would not break the bank yet it had to be smashing looking. Low and behold after a thorough first take my idea was "born".

All you need for this project is Aluminum foil, a stencil of your choice, white glue, paint for highlighting, water based sealant if you choose to.A Flat surface for working, a soft cloth and plenty of patience.

hhSo, what do you think? you like the look? Now lets get started. The process is as follows: Place your stencil on a flat surface place your piece of tin foil on top of the stencil, take your very soft cloth and gently rub the foil and you will get the imprint of the stencil design . You can do as little or as much as you like I did the whole measured sheets of foil I just kept moving the stencil around, underneath this foil back slash is regular white tiles, very boring to me. Ok now you take about a quarter cup of white glue and mix it with about three quarters a cup of water. Mix well, now you just carefully paint the glue mixture on the backside of the foil and ever so gingerly attach it to the backsplash area . Now your looking and admiring this stunning application. So go ahead and get it all done be sure to use a new razor for trimming around outlets and wall ends. Once that's all done its time to take a soft paint brush and a soft rag and apply the paint so the stencil starts to pop, I used black but what ever will be fine. Kind of play with it till you get the look you want. I just brushed and patted until I reached the look I was going for. This project is probably not for beginner but with a little practice it can be done.


Good luck and have fun with it!

WALLPAPER, A PERFECT ROOM STATEMENT!

 Welcome! Happy you could stop on by today.  I am so happy wallpaper has made a huge comeback.  With a bit of practice and the correct tools...