Wednesday, October 27, 2021

A Little Kitchen Makeover

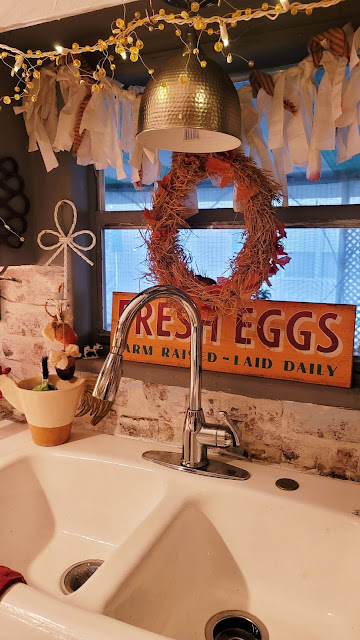
 Welcome! I don't know about you but it was time for a bit of a change in the kitchen. After all I practically live in there, how about you? I had been obsessing over different hues of green but it was great while it lasted. I have found that the Grey's lend a certain calmness  to a room. So I went with a darker shade of grey and painted up the soffit, wall around the window all which were green. The 2 facing walls are licorice black which plays very well with grey. I added a big shelf that could accommodate  big mugs, some greenery, my favorite cow print and some lights for whimsy. Below the shelf is a rolling cart which serves as a coffee/tea/hot chocolate drink center.  I also brought in my huge island a great asset to holiday baking. The open cabinet was also painted and filled with some ironstone. The kitchen window I made a garland added a raffia wreath.


How about you? Changed anything up or have plans to. 

                     Thankyou for stopping on in!

                                 Lisa

Tuesday, October 12, 2021

THE CUTEST LIL CHRISTMAS TREES MADE FROM BROWN PAPER

 Welcome! If you follow along you know how I love to make something from nothing. This craft is totally free. I used an empty soda box and brown paper from a box that I received in the mail today, I don't know if I was more excited about the contents or the brown packing paper. If you live in the south Publix grocery offers brown bags and also Aldis as well.  If you are unable to access those Dollar Tree has rolls of brown paper. Also old book pages would also work. For this craft you will need:

Empty soda box cardboard or cardboard of equivalent  weight

Brown paper

Hot Glue

Duct tape (used to hold the cone shape together)

Optional  paint, ribbon for tree decor


First step is creating a cone shape from the cardboard to the desired size. Use Duct tape to hold the cone shape. Trim the bottom so it sits flush on the table. 
Simply rip your brown paper into small sizes. Then simply one at a time sqish and roll the paper into a ball . The you can begin to Hot Glue the pieces to the cone. Keep going until the cone is completely  covered.

I left a bit bare on the bottom to represent a tree collar. Then I painted the very bottom.


I took a brush with white paint  and lightly brushed. 


This is a very easy craft and a great way to get family around the table, I enjoyed my afternoon crafting. You can add things such as glitter, beads, bows whatever you desire! These trees are definitely gift worthy. 

                                      Happy Crafting!

                                          Lisa

Saturday, October 2, 2021

Witches, local order lodge 305, fun Halloween decor!

 Welcome! It's been fun decorating today! Sure Halloween is not as fun as days gone by. Maybe no trick or treating but that doesn't mean we can't soup up the decor. Nowadays we have to come up with fun times at home and that can be done with fun decorations and foods. 

I decided to do up the fireplace with some witchery! The chippy with is very old about 30 something years. It's chippy paint adds to her potion character. When decorating just have some fun with it. An easy gathering of items and placed with imagination. 

This broom belonged to my mom who has passed , very old but still runs! Wink wink

The candelabra I found at a online estate saleable in good fun!


Thanks for stopping in. Now for my order of witches lodge #305......

                                         Lisa

Why Not Give Your Holiday Tree Some Easter Love!

 Welcome, thankyou for stopping on in today! Easter is swiftly approaching as I have been busy planning decorating and meal plans.  I have a...