Friday, August 19, 2016

You may want to save your cans!!

Hello...welcome. I have been busy with this "junk " craft. That would mean to me something that I would normally toss in the trash but instead I decided to repurpose it and that would some large tin cans that once had tomato sauce in it.  I left them outdoors for a bit so they could start to rust. Here in SW Florida we are topping off our rainy season with tropical storms everyday. So rust is not a problem.


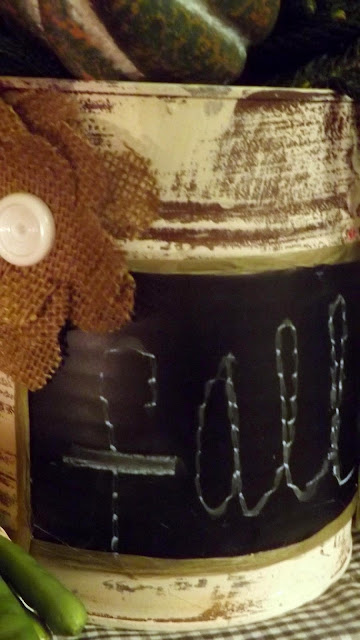
 Ok here is the tin can in all its ugly beauty.Hey some of us vintage rollin bloggers just love us a bit of rust!! As you can see very rusty. And that's a good thing if we are doing a vintage style project. Soon you will see where I am going with all this.... Give the can a dry painting which means leave some places without paint so you can see the rusty goodness. While that's drying you can make the can embellishments.
 I found this great product from Duck, it is contact chalkboard...just love it!! If you don't have this you can just paint a little chalkboard in the front of the can.
 So now were going to make some burlap flowers , so easy , just cut 3 different size flowers this shape(sm., med. and lg) Get you hot glue gun ready, place the largest on the bottom then the med. and then sm. ...glue them with the hot glue in the center. They should look like the photo below. Get out your button stash and hot glue a pretty button in the middle.


 This would also make a pretty hostess gift maybe filled with some fall cuttings from your garden.


 I stuffed the can with some Norfolk pine and faux harvest. I also took some green paper ribbon and hot glued around the Chalk board. You can place the burlap flower where ever you see fit. I liked it on the side.


This would make a pretty table centerpiece! You can fill them with whatever you have on hand ! There are many ways to "rust" up recipes so you don't have to wait for the rust to appear it can be forced.
 
So there you have it a very inexpensive way to have something pretty!
Thanks for stopping by
Lisa
Come join me as I share my crafts at the following parties:
 

Saturday, August 13, 2016

Rag wreaths, a great way to incorporate Farm house & color in your decor

Hi there.....happy you could stop in.  Been busy getting things ready for online sales. I am so pleased to say that Natalie, a young entrepreneur  has joined me in my crafting. She paints so well...she does the first coat, 2nd coat then I go and do the stenciling etc. She also knows how to make rag wreaths and garlands. When she was very young she started to paint...she joined me painting one day, we were painting the dining room and I did not realize she painted the face of a wall clock lol.


 This rag wreath we call dish blue....it has the blues that are found in the pretty vintage blue and white dishes. We Attached a small chalkboard so whom ever purchases it can state their greetings.


 A vintage style painted tin bucket with rope handles and a burlap flower.


 A green color scheme with a rose arrangement


Thanks so much for stopping in and seeing what we are crafting!
                                                                     Lisa


Join me as I share my crafts here,
http://www.cottagemakingmommy.com/2016/08/surviving-dog-days-of-summercome-join.html
http://mrsblackstone.blogspot.com/2016/08/rag-wreaths-great-way-to-incorporate.html

Thursday, August 11, 2016

OK...so I have a table addiction, I admit it. Come see what I did with a round dining table..

Welcome......So as you can see I admit to buying too many tables. Big, small any size, I just want to buy them and paint them pretty. Lucky I have some storage in the back shed. I am getting yelled at though...you know it goes something like this:, "You don't need all these things!". Oh shush I say.

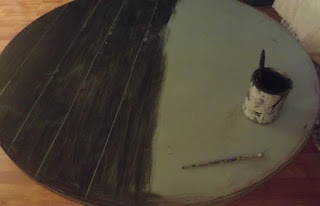
So anyway I had this huge round table sitting in storage so I thought Well I need a bigger coffee table, so I carried it on in and prepped her up. Got all my paints and imagination out! I mixed up some dark chalk paint using baking soda and painted the whole thing dark and added some lines with a yardstick  to make it look like pieces of wood.


Then I got the idea to make it a huge clock...we have a child here that's learning how to tell time so I did not paint on the hands of the clock ... she can draw them on with chalk for some learning fun!


The table is a good size and reachable by 2 couches and a large leather chair. I had an iron base from a bench that worked perfectly married to this coffee table. Just a fun table makeover for the family to enjoy.

                                                      Thanks for stopping on by!
                                                                   Lisa


Come join me for some incredible inspiration where I share my crafts!

http://www.bluewillowhouse.com/2016/08/04/vintage-charm-43/

http://www.funkyjunkinteriors.net/2016/08/diy-salvaged-junk-projects-3.html

Wednesday, August 3, 2016

A TABLE REDO WITH SOME VINTAGE STYLE LOVE

Welcome friends! Happy you could stop by to see what the heke I'm up to now. I had this wonderful pedestal table that I decided to move into the kitchen. Its not very big without the leaf and has a great pedestal . I thought it would be a great place to do some homework have a little lunch or just sit and chat over some coffee.

This process was not easy....it took 3 paint applications. So it started like this..
I t was all white, so I painted sea green, dark green, red and yellow thick stripes, I dry brushed it on. Let that dry , then took a dark brownish grey and painted the whole thing so no colors were visible. Once all dry I took and painted the sea foam color dry brushed that on. Then I quickly took the opposite end of a small paint brush and made plank lines by using a yard stick.

So when that was completely dry the fun started lots of sanding and scrapping I wanted to get a real old effect. I just kept scrapping until enough was a enough. A coat of non shiney polyurethane as the last step.


Little peeks of color are visible after sanding and scraping


I do understand that not everyone would like so much wear and tear on a piece of furniture. But I love wood that's been through the elements. The apron of the table I painted the sea foam green color. Creating a well weathered piece of furniture can take some time and patience and this style is not for everyone.
  So pleased that I was  Featured at  The Blue Willow House Vintage Charm!  Thank you Sharon

 
Thanks so much for visiting!                                  Lisa   
Come join me for some parties:
http://www.bluewillowhouse.com/2016/08/04/vintage-charm-42/
http://www.cottagemakingmommy.com/2016/08/beat-dog-days-of-summer-come-join-ss.html

WALLPAPER, A PERFECT ROOM STATEMENT!

 Welcome! Happy you could stop on by today.  I am so happy wallpaper has made a huge comeback.  With a bit of practice and the correct tools...