Hi there! happy you could stop in, so really what's your very favorite pumpkin? . My all time favorite is the Tiger pumpkin. They can be found at Wal-Mart along with the tiny white Baby Boo's. Just a hint of orange markings and lots of white. One of my fondest childhood memories includes a trip to the Pumpkin patch and of course a sample of homemade Apple Cider. Unfortunately here in the southern part of the US Apples simply do not grow here, it's a matter of fact Oranges and all citrus will be ready for picking in November. But for Apples and cider we have some wonderful farm markets here stocked with all the Northern treasures.
so for about 3.00 for 3 in a net sack you can take these cuties to your home. Many other varieties are also available such as Pink, Blue, Green and White Pumpkins. And of course the big Jack-O-Lanterns for carving fun. In the plant world Pumpkins technical name is Cucurbita which also includes Squash, melons and cucumbers . Funny enough they are all in the same plant family. They even have seedless pumpkins.... now what fun would that be if we couldn't cook and eat the seeds? Thanks for stopping in and have a wonderful day!
Vintage Farm House style decorating and repurposing on a dime, thrifty and delicious recipes , lots of crafting ,gardening and much more thrifty do's. Follow along without having to purchase expensive items to decorate your homes......why? Cause we are going to make it ourselves! So join me for some crafty fun.
Thursday, October 9, 2014
Wednesday, October 8, 2014
WELCOME TO OUR FALL STOOP FEATURING THRIFT STORE WOODEN PUMPKINS!
Hi there! Enjoying Fall? The weather has even changed some here in Southwest Florida....cooler mornings and evenings. My favorite time for baking yummy Fall favorites as well as warm the heart and soul kind of dinners. Today I have decorated the front stoop, I have included my 2 wooden pumpkins that I found at our local thrift store.
These solid wooden guys are just crying for some love and attention and @ .99 each they for sure came home with me. I mixed up some homemade chalk paint using a bit of baking soda in my paint and gave them a blanket of white.
After the pumpkins were dry I gave them a good sanding then a pretty bow. They are the stars of our front stoop this year.
A few marigolds , mint and basil from my garden sit in a mason jar surrounded by my favorite natural décor , pinecones.
This vintage ladder back chair belonged to a very dear friend that passed away, so every time I look at it brings back memories of our many chats he experienced in the olden days.
Someone took great care crafting these pumpkins the center has a dowel for the stem.
The wrought iron railing is covered with a fall leave garland attached to some orange rope lighting. Those of you that know me know that I love to use different kinds of lighting in décor , to me it adds some festive flavor.
But the most favorite fall décor hangs on my fridge made by our sweet Natalie!
Come party with me ! www.bluewillowhouse.com/2014/10/08/wordlesswednesday
Tuesday, September 30, 2014
MILK JUG GHOSTS, A FUN FAMILY FRIENDLY CRAFT!
BOOOOO! Thanks for joining Sweet Tea N' Salty Air, I have a Halloween craft that the whole family will want to join in on! With just some items that you probably have in your home you can craft these so very Boootiful Ghosts!
You will need a piece of semi sheer material, white in color. I used the flat white part of an old dust ruffle. A hanger, some black paint.....
A battery operated tea light, sold very cheaply at the dollar store or craft store etc.
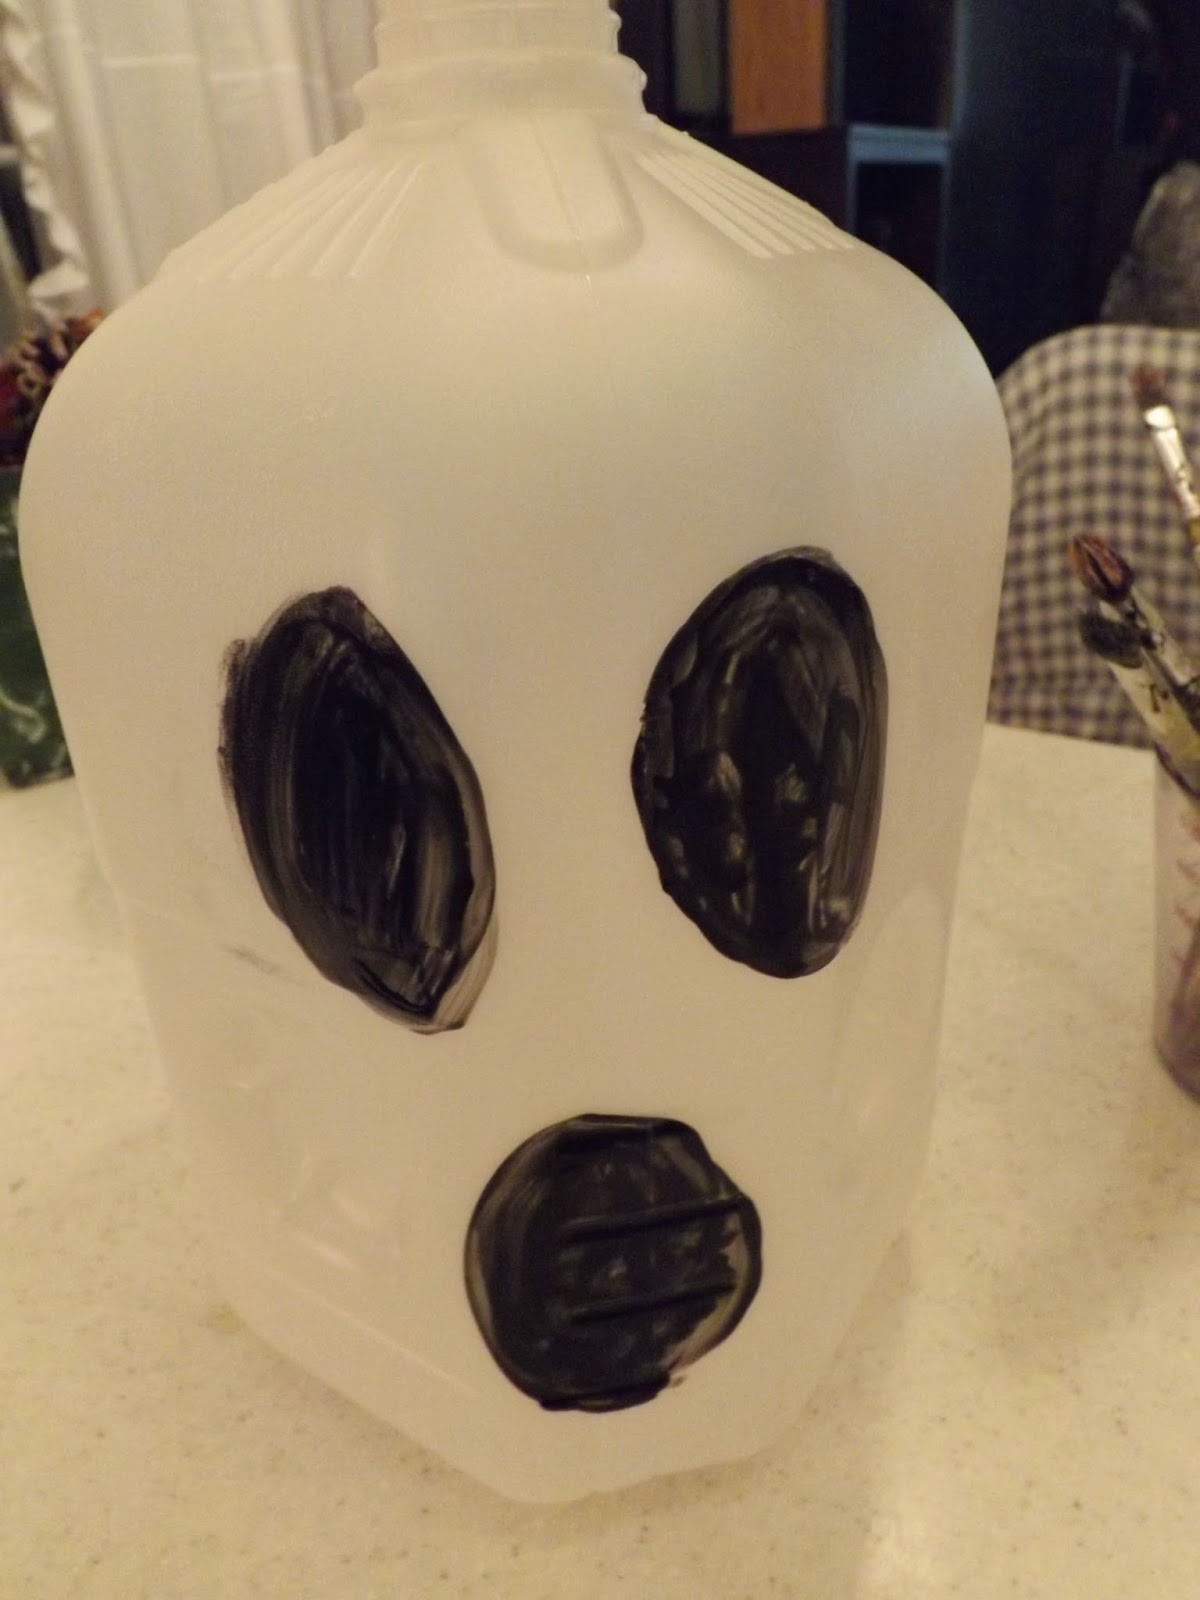
A plastic milk jug that you will be painting on the eyes and mouth , You will be making 2 small incisions in the bottom of the jug so that the handle of the hanger can thread through....
On the back of the milk jug you will make a tiny door big enough to get the tealight to turn on and off.
Now when the hanger is in place and the black paint is dry go ahead and hold the top of the jug and drape that piece of white material over it don't forget to turn on the tea light........ this is the part the kids are going to love..... turn your light s down low and .......
I am going to make several and do up the front porch for All Hallows Eve. An easy way to hang these is to attach a strong paper clip and just feed it through the jug handle. This craft did not cost me any money to make . Have fun making your ghosts!
www.shakentogetherlife.com/2014/10/creativity-unleashes
You will need a piece of semi sheer material, white in color. I used the flat white part of an old dust ruffle. A hanger, some black paint.....
A battery operated tea light, sold very cheaply at the dollar store or craft store etc.
On the back of the milk jug you will make a tiny door big enough to get the tealight to turn on and off.
Now when the hanger is in place and the black paint is dry go ahead and hold the top of the jug and drape that piece of white material over it don't forget to turn on the tea light........ this is the part the kids are going to love..... turn your light s down low and .......
Saturday, September 27, 2014
AN ENDLESS TIME WOOD & PALLET CLOCK COFFEE TABLE MADE BY ME!
Hi there, so happy you could stop by. I spent all day Friday making this coffee table. We decided to change up the living room a bit and place the 2 full size couches on each side of the humungous 3D theater tv, and the big overstuffed chair front and center but when I made the move the present coffee table was way out of scale so I was planning on scouring the thrift stores for something smaller but still round that I could paint over and vintagize . But I got to thinking and planning on Thursday night that I could craft one myself. And that's just what I did, my daughter is in construction so I get pallets and wood frequently. Shes a determined young lady who may just be the next house flipper on HGTV one day. Shes learning all the trades an aceing them all.
So everyone was gone on Friday so I quickly got my chores done then packed up all my tools ,gathered my pallets and wood, paints etc... and went to work . I knew I wanted to design the table as a clock, I just love the big Jumbo wall clocks. I started by measuring the space between the 2 couches so 30 in. would be ideal. so I took my piece of 1/2 in plywood and put a nail in the center attached a string to it then the other end of the string to a marker and drew the perfect circle. And then cut it out with my new jigsaw. My neighbors hear bagging and cutting and wonder what the heke this lady is up to.
Now it was time to take the pallets apart but with this jigsaw it was easy sailing. If your wondering why this picture is a bit blurred , that's what happens when you take a camera that's been in AC out to some humid hot weather.
Took the pallet pieces like a puzzle and fit them in perfectly. After they where all set in place on the plywood I simply nailed them in place. After they where nailed I tuned it over and cut around with the jigsaw.
Pallets stripped of all the wooden planks.
Once the pallets were cut to fit the plywood base it was time for a base coat of black paint.
It's starting to shape up......I then put a coat of very light lime green over the black.
Here "he" is all dressed as a vintage clock.Notice I refered to it as a he? Usually when I am painting furniture they are refered to as ladies. For the base I used a wrought iron piece that once was the base of a fire pit. So glad I didn't toss this out because it fits perfectly.
I stenciled on the roman numbers of time and also the "southern Farmers 1809" ,
I did allot of sanding to get the vintage look.
Now everyone has leg room and a place to set their drinks on during movie time , I was upset about a huge 75 inch tv but secretly I cant wait to watch "Christmas Vacation " with Chevy Chase on it.
The distressing made the table look very old.
Now Im not a pro at wood working but I tried my hardest. My son said "you didn't make that", I took that as a compliment , it's not everyday that a thirteen year old gives those out!
So this project was free to make, had the wood and paint and was done in about 5 hours including drying time. Pallets are free for the taking in most communities, a good place to find them is Craigs list. I told my daughter to keep those pallets coming cause I have allot of projects in mind. Thanks so much for taking a peek at my new crafted coffee table! So get your jigsaw , hammer nails, paints , tape measure etc.... ready to role so you too can craft something pretty.
Come join me at the following fun linky parties! www.funkyjunkinteriors.net/2014/09/salvaged-junk-treasure
www.shabbyartboutique.com/2014/10/shabbilicious-
friday-link

http://missmustardseed.com/2014/10/furniture-feature-friday
So everyone was gone on Friday so I quickly got my chores done then packed up all my tools ,gathered my pallets and wood, paints etc... and went to work . I knew I wanted to design the table as a clock, I just love the big Jumbo wall clocks. I started by measuring the space between the 2 couches so 30 in. would be ideal. so I took my piece of 1/2 in plywood and put a nail in the center attached a string to it then the other end of the string to a marker and drew the perfect circle. And then cut it out with my new jigsaw. My neighbors hear bagging and cutting and wonder what the heke this lady is up to.
Now it was time to take the pallets apart but with this jigsaw it was easy sailing. If your wondering why this picture is a bit blurred , that's what happens when you take a camera that's been in AC out to some humid hot weather.
Took the pallet pieces like a puzzle and fit them in perfectly. After they where all set in place on the plywood I simply nailed them in place. After they where nailed I tuned it over and cut around with the jigsaw.
Pallets stripped of all the wooden planks.
Once the pallets were cut to fit the plywood base it was time for a base coat of black paint.
It's starting to shape up......I then put a coat of very light lime green over the black.
Here "he" is all dressed as a vintage clock.Notice I refered to it as a he? Usually when I am painting furniture they are refered to as ladies. For the base I used a wrought iron piece that once was the base of a fire pit. So glad I didn't toss this out because it fits perfectly.
I stenciled on the roman numbers of time and also the "southern Farmers 1809" ,
I did allot of sanding to get the vintage look.
Now everyone has leg room and a place to set their drinks on during movie time , I was upset about a huge 75 inch tv but secretly I cant wait to watch "Christmas Vacation " with Chevy Chase on it.
The distressing made the table look very old.
Now Im not a pro at wood working but I tried my hardest. My son said "you didn't make that", I took that as a compliment , it's not everyday that a thirteen year old gives those out!
So this project was free to make, had the wood and paint and was done in about 5 hours including drying time. Pallets are free for the taking in most communities, a good place to find them is Craigs list. I told my daughter to keep those pallets coming cause I have allot of projects in mind. Thanks so much for taking a peek at my new crafted coffee table! So get your jigsaw , hammer nails, paints , tape measure etc.... ready to role so you too can craft something pretty.
Come join me at the following fun linky parties! www.funkyjunkinteriors.net/2014/09/salvaged-junk-treasure
friday-link
http://missmustardseed.com/2014/10/furniture-feature-friday
Thursday, September 25, 2014
HOMEMADE BREAD A FALL FAVORITE HERE AT SWEET TEA N' SALTY AIR!
Welcome! Fall kicks off many wonderful traditions such as Pumpkins, beautiful foliage, hot Chocolate and home baked goodness! My flour and sugar jars are filled to the brim and ready for some baking action. I must admit summer was many grilled out dinners and being here in Southwest Fla. we grill all year through. But Fall brings home baked breads, muffins , pies etc.
As a little celebration of Fall I decided to make some homemade Cuban bread , My favorite back North was always Italian bread but here Cuban bread is super yummy! Bread is easier than you think! Even if you never made homemade bread this recipe is easy.
The steps are easy, dissolving the yeast in very warm water.
All ingredients gets mixed well, Don't have doe beaters ....use what the good lord gave you! I always use my hands for doe making, this allows you to get to know the doe so to speak. It put you closer to all the steps the doe goes through....stop laughing I can hear you! lol
Kneading is important , you want to get all the lumps needed out and get it to a smooth texture. Funny story....I was making doe with little Natalie and the only way I could describe kneading was to be mean to it, slap it down and keep repeating.
I have been bread making for 20 years since I was a little girl. This Cuban bread differs from most. Most recipes you just plop the doe in a loaf pan , with this bread you roll it out into a rectangle about 10x15 or so and jelly roll it. Don't skip this process it is very important. These have been rolled and have been placed in the oven to bake.
All done! lightly browned and ready to mop up some homemade Italian soup!
Here is the recipe, the book is older than the hills....for real.
I hope youll try this recipe its super easy and bakes up perfectly, This bread is a winner, the texture and taste is perfect. Happy bread making to you!
Subscribe to:
Posts (Atom)
SUMMER SNACKS TO MAKE FOR THE KIDDIES!
Welcome! Most children are on summer break and they will be asking for snacks lol. I have been making these handy snacks for years. I make ...
